These tops are a knock-off of a top I bought in H&M earlier in the year:
It is a very simple shape with slightly dropped sleeves. I took it to my pattern cutting class and basically drew round it then took lots of measurements to ensure the pattern was symetrical etc. As I discovered during the summer when using a top as a pattern, RTW cutting doesn't seem to be very accurate.
Top number one I used fabric bought at the NYLon14 on Goldhawk Road.
I loved the multi coloured abstract pattern. I had bought lots of it so was happy to cut straight into the fabric with my self drafted pattern. Original top has three-quarter length sleeves that are full length and stitched rolled up, so I just made the sleeves full length. I am extremely pleased with it and have worn it alot.
I wrote myself some intructions for the construction, which were basically the following:
*sew one shoulder together
*attach neck band
*sew other shoulder
*attach sleeves pieces
*sew side seams from sleeve hem down to the hemline of the top
*hem sleeves and top
voila!
Top number two was for Eldest for her birthday. Eldest is a fangirl. She loves Harry Potter, Doctor Who, Mortal Instruments, Sherlock, Cherub to name a few (the main ones!) She seems a fairly happy recipent of mum made clothing, so I thought I would make her a top for her birthday with some themed fabric. I went to Spoonflower and got sucked down the rabbit hole that is internet fabric shopping! The choice of Doctor Who themed fabric was mind boggling, but I eventually settled on this in their cotton knit:
The fabric took much longer to arrive than I had anticipated. It arrived about 2 weeks after her birthday, then I put it in a safe place where she wouldn't stumble across it, then found it about a month later. The fabric has a very nice feel to it, butis shrank quite alot after I washed it. I had ordered a metre but after washing only had about 87cm (something like that). I was very glad I had washed it before cutting everything out. She was very pleased with the fabric but decided, wisely I think, to go with a solid as well - overall Tardis's (Tardi?) might be a bit much!
This top is the same size as the one I made for me, but with minimal seam allowances. I intially sewed it up with normal 1.5cm seam allowances, but when she tried it on it was a little snug - she is a bit larger than me in the chest department. I just whizzed down the sleeve/side seam with the overlocker, unpicked the original seam and now it fits fine. She asked for the patches on the elbows, having seen the patches on my Plantain Tee. I put those on before I sewed the side seams.
The plain fabric is a petrol ponte knit left over from my Lady Skater dress and was perfect to go with the dark green/petrol Tardis's/Tardi in the print. The eagle-eyed may notice that there is a seam across one of the sleeves. This is of course a design feature, and nothing at all to do with having to piece the fabric together in order to get two full sleeves!
These were made a little while ago now, but I have quite a bit of catching up to do. Overall I am very pleased with these two tops. The only thing I would change when I make it again would be to scoop the neck line down a bit at the front. The neck line seems a bit higher on these than on the original.
Have you copied/used for insipration a shop bought piece of clothing?
Showing posts with label Goldhawk Road. Show all posts
Monday, 29 December 2014
Tuesday, 18 June 2013
FO:Sludge coloured top - Burda Raglan Shirt 02/2013 #127
This top first appeared in MMM13 and is a top that I started during a quiet patch in the Wedding sewing. I had a short period of time where I couldn't do much on my sister's dress until she had tried it on. She very kindly, at my request, bought the February issue of the Burdastyle magazine for me as my local WH Smiths doesn't stock it. I had had a flick through on previous trip, and dithered about it, but I kept thinking back to this top and a couple of variations in the magazine.
I used a slinky, olivey sludgy grey viscose jersey which I bought in Goldhawk Road towards the end of 2011. I think I had a little over a metre but it was very wide and managed to squeeze the top out of it. During this quiet patch, I cut out the top and gathered the appropriate section of the sleeves.
Wedding sewing picking up again, so this was put to one side for sometime. It was a reasonabley quick sew taking a couple of evenings . I started sewing it on my overlocker - I sewed one sleeve piece onto the back, and then reverted to sewing the rest on my sewing machine and just finishing the seams on the overlocker. I was a bit nervous about making an mistake with the blade down and the jersey was so slinky I felt I couldn't control it through the machine properly. I ended up sewing most of the seams with tissue under the fabric to stop the sewing machine eating it up.
I sort of followed the Burda instructions, known for being on the incomprehensible side. By which I mean that I did what I thought I should do, read the instructions, thought 'oh good, done that bit then', and moved on. The neck was a bit more tricky. I read and reread the instructions and then used Melissa from Fehr Trade's instructions for putting on a neck band as described in her post about the top she made from this pattern.
I never know at this point, whether to do the top stitching of the neck band with a zigzag or straight stitch. The neck is wide enough that it doesn't need to stretch over my head, so maybe next time I'll try a straight stitch.
| Youngest took this picture which explains the dodgy angle |
I had noted from Melissa's post and a couple of other people's that it was very long in the body and sleeves. I really like long sleeves, so thought I would wait and see on the length of the body. Having done everything except the hem I tried it on and was initially very disappointed. It made me look a bit frumpy and matronly (Ohhh, Matron!!). I then showed it to Husband, who took one look at it and said 'there's something wrong with the length'. As soon as I tucked the hem up and had it at hip length rather than top of thigh length, it made all the difference. That difference was roughly 10cms, possibly more. If you look at the picture below, the original length would have been to the bottom of the back pockets.
| not sure what I am doing in this picture! |
I have worn it a lot, although it was mostly covered up during May due to the miserable and pretty cold weather that we had. I recently packed away my winter wear for a couple of months, but I will be keeping this one out to tide me over on cooler summer days.
When I joined Rachel and all the other sewists for the epic London meet-up, I found another bolt of the same stuff (or possibly even the same one) and nearly bought some more. Instead I found some brown and sparkly striped jersey knit especially to repeat this top for the autumn. Look out for the next one (with my record it could be some time!)
Monday, 29 April 2013
I made a WEDDING dress!
Next in my catching up posts is the project that was taking up all my 'spare' time before Easter. I hinted at this in an earlier post:
I was making my sister's wedding dress!
no pressure or anything....
My sister, Holly, asked me if I would consider making her wedding dress probably around this time last year. We had long discussions about styles and eventually types of fabric. I was keen to do it as long as the dress wasn't too complicated and the fabric was manageable - I didn't want to say yes and then not be able to deliver. We settled on a pattern:
and decided on the lace overlay of view B with the long drapes at the back of view C.
Towards the end of last summer I took her to Goldhawk Road and Soho to look at fabric, just to get an idea of what was available and what kind of thing she liked. There was much discussion about the samples that we picked - which lace looked best over which other fabric, differing tones of ivory, champagne and cappuccino, how to incorporate some features she had seen on dresses that she had tried on....
When she finally decided on the lace she wanted, the shop (in Goldhawk Road) had sold out. A little bit of panic browsing in other shops didn't come up with anything else she fancied, however John Lewis turned up trumps - a beautiful embroidered silk organza in the perfect colour and half price!
I made a toile from a very cheap poly satin (£2 a metre), following the size indicated on the pattern envelope for her measurements. It turned out to be enormous in all directions. I know pattern companies add quite a lot of ease to patterns but really... Next I compared her measurements to mine as we are quite similar shapes. Most of her measurements were within a centimeter or two of mine, so I had a brainwave - we had not long completed paneled skirts in my pattern cutting class, so I pulled out my paneled skirt pieces, laid them on top of the pattern pieces and worked out I need to go down a couple of sizes and we'd be just right. I started on the the dress at the beginning of February and the Wedding was in April - it didn't seem a long time but I spent every moment I could on it just to be sure I could get it finished before Easter to the standard I wanted. I'm sure that I could have done it quicker, but the rest of my life had to be lived too!
The rest of the post will be mostly pictures, so bear with me!
I had to cut out all the pieces three times - main dress fabric, the overlay and the lining - luckily I have quite a bit of floor space
After my sister had tried the dress on a few times I felt that it needed a bit of weight to help it hang well. My mother in law very kindly got some special hem weight cord from McCulloch and Wallis in London.
In the run up to the wedding Holly had done the usual bride thing of losing a bit of weight, which meant on her final try on before I went on a skiing holiday (arriving home 4 days before the wedding!), I had to try and tweak the fit easily. Luckily, the drapes at the back could be arranged in such a way that all I needed to do was add a small hook and eye at the back and no-one was any the wiser!
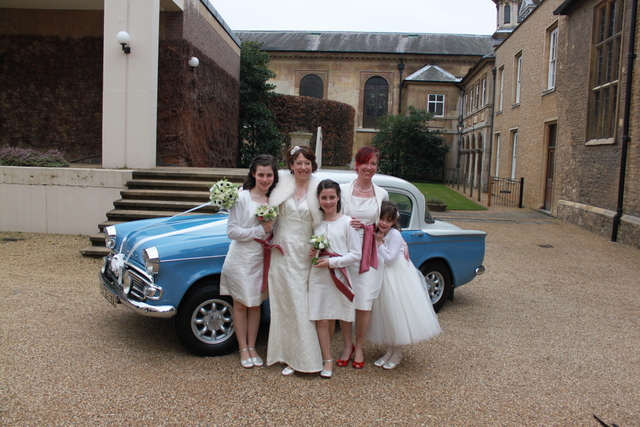
On the day itself, the forecast was not promising and ended up being pretty windy, wet and chilly. This meant that even in the official photos there are hardly any of Holly without warmer layers on top, making it pretty hard to see the dress:
Probably the most important thing I have ever made and I'm super pleased with the way it turned out! She was a beautiful bride and I was proud to have been involved in her special day in such a special way.
I was making my sister's wedding dress!
no pressure or anything....
My sister, Holly, asked me if I would consider making her wedding dress probably around this time last year. We had long discussions about styles and eventually types of fabric. I was keen to do it as long as the dress wasn't too complicated and the fabric was manageable - I didn't want to say yes and then not be able to deliver. We settled on a pattern:
and decided on the lace overlay of view B with the long drapes at the back of view C.
Towards the end of last summer I took her to Goldhawk Road and Soho to look at fabric, just to get an idea of what was available and what kind of thing she liked. There was much discussion about the samples that we picked - which lace looked best over which other fabric, differing tones of ivory, champagne and cappuccino, how to incorporate some features she had seen on dresses that she had tried on....
When she finally decided on the lace she wanted, the shop (in Goldhawk Road) had sold out. A little bit of panic browsing in other shops didn't come up with anything else she fancied, however John Lewis turned up trumps - a beautiful embroidered silk organza in the perfect colour and half price!
I made a toile from a very cheap poly satin (£2 a metre), following the size indicated on the pattern envelope for her measurements. It turned out to be enormous in all directions. I know pattern companies add quite a lot of ease to patterns but really... Next I compared her measurements to mine as we are quite similar shapes. Most of her measurements were within a centimeter or two of mine, so I had a brainwave - we had not long completed paneled skirts in my pattern cutting class, so I pulled out my paneled skirt pieces, laid them on top of the pattern pieces and worked out I need to go down a couple of sizes and we'd be just right. I started on the the dress at the beginning of February and the Wedding was in April - it didn't seem a long time but I spent every moment I could on it just to be sure I could get it finished before Easter to the standard I wanted. I'm sure that I could have done it quicker, but the rest of my life had to be lived too!
The rest of the post will be mostly pictures, so bear with me!
| late night cutting out of main dress fabric |
| making sure the overlay fabric matched on the bodice |
| lots of pinning... |
| ...and hand basting of overlay to main fabric |
![]() | |||||
| hem weights being sewn into the dress |
When Holly had been looking at dress ideas she had seen one of a similar style that had layers of chiffon on the bodice to preserve modesty in that area. As this had quite a plunging neckline, she had asked me to come up with something similar. I used two layers of a crinkly chiffon cut on the bias and of different widths. I was concerned about how to finish the edges, but on close inspection of the inspiration photo we concluded that the edges had been left raw - this is what I came up with:
| bais cut chiffon strips |
| loop that held back drapes in place |
On the day itself, the forecast was not promising and ended up being pretty windy, wet and chilly. This meant that even in the official photos there are hardly any of Holly without warmer layers on top, making it pretty hard to see the dress:
| Holly, my girls and me |
| lovely view of the drapes minus the cardi and fake fur bolero! |
Subscribe to:
Posts (Atom)